Push notifications. I fondly remember watching Apple’s WWDC keynote highlighting this new type of notification. Apple claimed it would push to your device without the app running in the background (which was their way of saving battery life). It was all the rage in the newest version of iOS–iOS 3.0. Nowadays the term “push notification” has taken a slightly different meaning, but the concept is the same to what was announced back in 2008.
So what does it mean to have push notifications in a browser? Why is it important? Well for one, it brings that all too familiar gap between ‘native’ and ‘web’ much closer. One of the most important features for a native app is the ability to send its users notifications–important for not only the user (so that he/she is constantly updated if something has changed), but also–perhaps more so–for the app developer. As users, we have become more and more ANGRY over the amount of spam in our inboxes. Notifications offer a slightly different experience–a place where we normally have more control as to what we get notified about.
A little while ago I was listening to one of my favorite Podcasts, ShopTalk. This particular episode featured Alex Russell from Google, who spoke about how the web was ‘catching up’ to native apps and highlighted a few examples, one of course being push notifications. You may be thinking, “but wait, Chrome has had notifications for awhile. What’s the big whoop?” You are most certainly correct that notifications have been around for some time, but now they have the ability to utilize service workersso that they can work even when an app is closed (meaning you still get the notification after the browser tab is closed). Let’s take a look at how this all works.
Starting With a Simple Example
So how to get this working. It’s quite easy to get something simple working. The complexity comes in when trying to account for all the fancy stuff–Is push already enabled when the page loads? How to unsubscribe? Etc. We shall avoid most of that. Getting the basic principles down is what’s important. At the end of this post you’ll find some additional resources.
First, we need some basic stuff–a button and an event listener–so let’s do that first.
<button class="the-button">Enable Push Messages</button>
index.html
var theButton = document.querySelector('.the-button');
theButton.addEventListener('click', function() {
    subscribe();  // don't worry about this method quite yet, we'll create that later
});
push-notifications.js
Next thing we need to do is tell our service worker what to do when a push is received. Create a new file and name it something like ‘service-worker.js’. Make sure that this is in the root of your app, not in a subdirectory like ‘scripts’ for instance. The service worker has to be in the root level of your app (more info here).
(function() {
    self.addEventListener('push', function(event) {
        self.registration.showNotification('Service Worker Example', {
            body: 'An example of what the body of a service worker could show. In a working app, you would want this to be dynamic, but you\'d just do that within your JavaScript. Cool!',
            icon: 'some-icon.png',
            tag: 'unique-identifier-of-some-sort'
        });
    });
})();
service-worker.js
All we’re doing here is creating a new listener for the ‘push’ event and showing the notification with some parameters passed in via an object literal. Pretty simple stuff so far, right?
To get this thing up and running we just need to register that service worker JS in our main JS file (push-notifications.js). We do that like so:
navigator.serviceWorker.register('/service-worker.js');
push-notifications.js
The cool thing is that this register method returns a promise, so we could use that to initialize some sort of state when the service worker is registered. For instance, maybe we’d want to disable the button until this is complete. Or perhaps we’d want to check to see if this user already has push notifications enabled and then change the button text to ‘Disable Push Notifications’ if so. Lots of possibilities and we’d almost always want to check for that sort of thing, but for now we’re just trying to keep things simple.
Now for the fun part. Let’s test this out. Cross your fingers, and click ‘Enable Push Notifications’. Oh no! An error in the JS console! But why?! One thing we missed. A manifest.json file that Chrome requires for all of their extensions. This part may only be necessary in Chrome once other browsers implement push notifications, or maybe others will adopt something similar, so for now, let’s just start with something simple. Create a mainifest.json file in the root of your project and copy/paste the following (you don’t need to change any of the values quite yet).
{
    "gcm_sender_id": "123",
    "gcm_user_visible_only": true
}
manifest.json
Try clicking the button again and you should see the button text change. Also open your console and look for ‘pushing now enabled!’, which we console logged in our subscribe method.
To test the actual notification, Chrome has some tools to help out (oh, but of course they do!). First there’s the chrome://inspect/ control panel you may already be familiar with. If you click on ‘Service Workers’ in the left panel, you’ll be able to see process IDs for which service workers are currently running. Sweet! Next we have chrome://serviceworker-internals/. You should see the active worker at the top. Go ahead and click the ‘Push’ button. Boom! A notification! Perhaps? Hopefully? If not try unregistering/stopping any active workers that are there and look for any console errors when clicking the enable button.
So that’s it! We just learned the basic premise of how to get push notifications in a browser working. What’s cool is that you can even press that ‘Push’ button after closing the application’s tab. Supposedly on Android devices this works similar to native, but I haven’t been able to test that out. If you do, let me know about your experience in the comments!
Using Google Cloud Messaging
As mentioned earlier, this is meant to be a very low-level start to push notifications. However, how much fun is one really able to have always having to go into Chrome’s internals to send a message. Lame, right? Don’t fret, got you covered. Google Cloud Messaging(GCM) is the answer. Think of it as the server that is able to communicate with your user’s service worker in his/her browser. Now, you’ll eventually need to build something that communicates with GCM, but that’s not something we need to worry about right now.
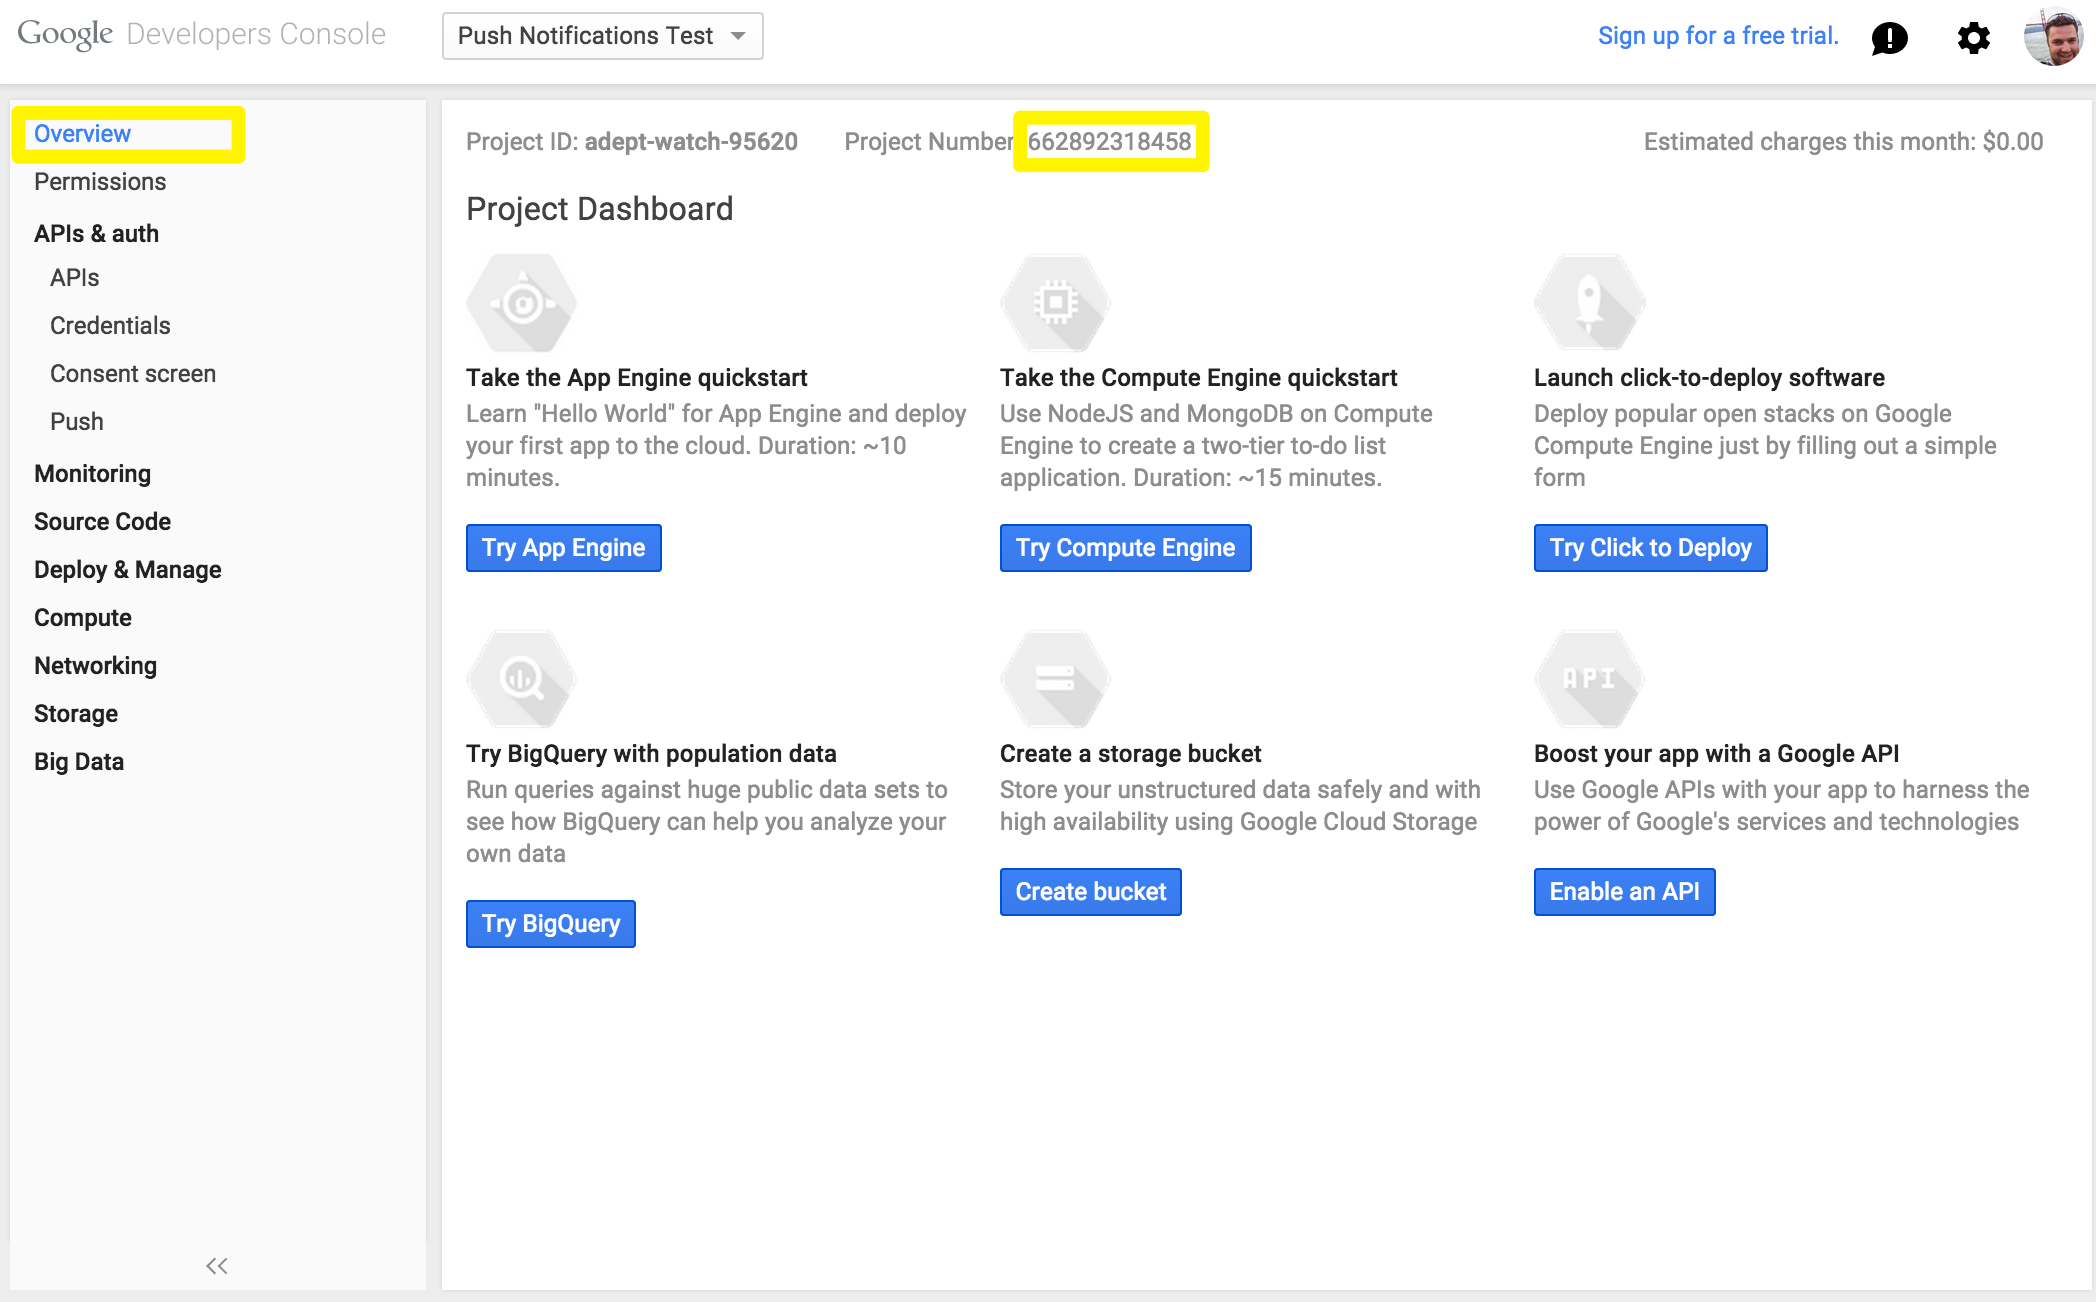
First, we need to create a new project in the Google Developers Console by clicking the blue ‘Create Project’ button. Type a name, it can be anything. I went with ‘Push Notifications Test’. Finally, click ‘Create’. You’ll need to make note of two things, your project number and an API key.
The project number can be found on the overview tab at the top.
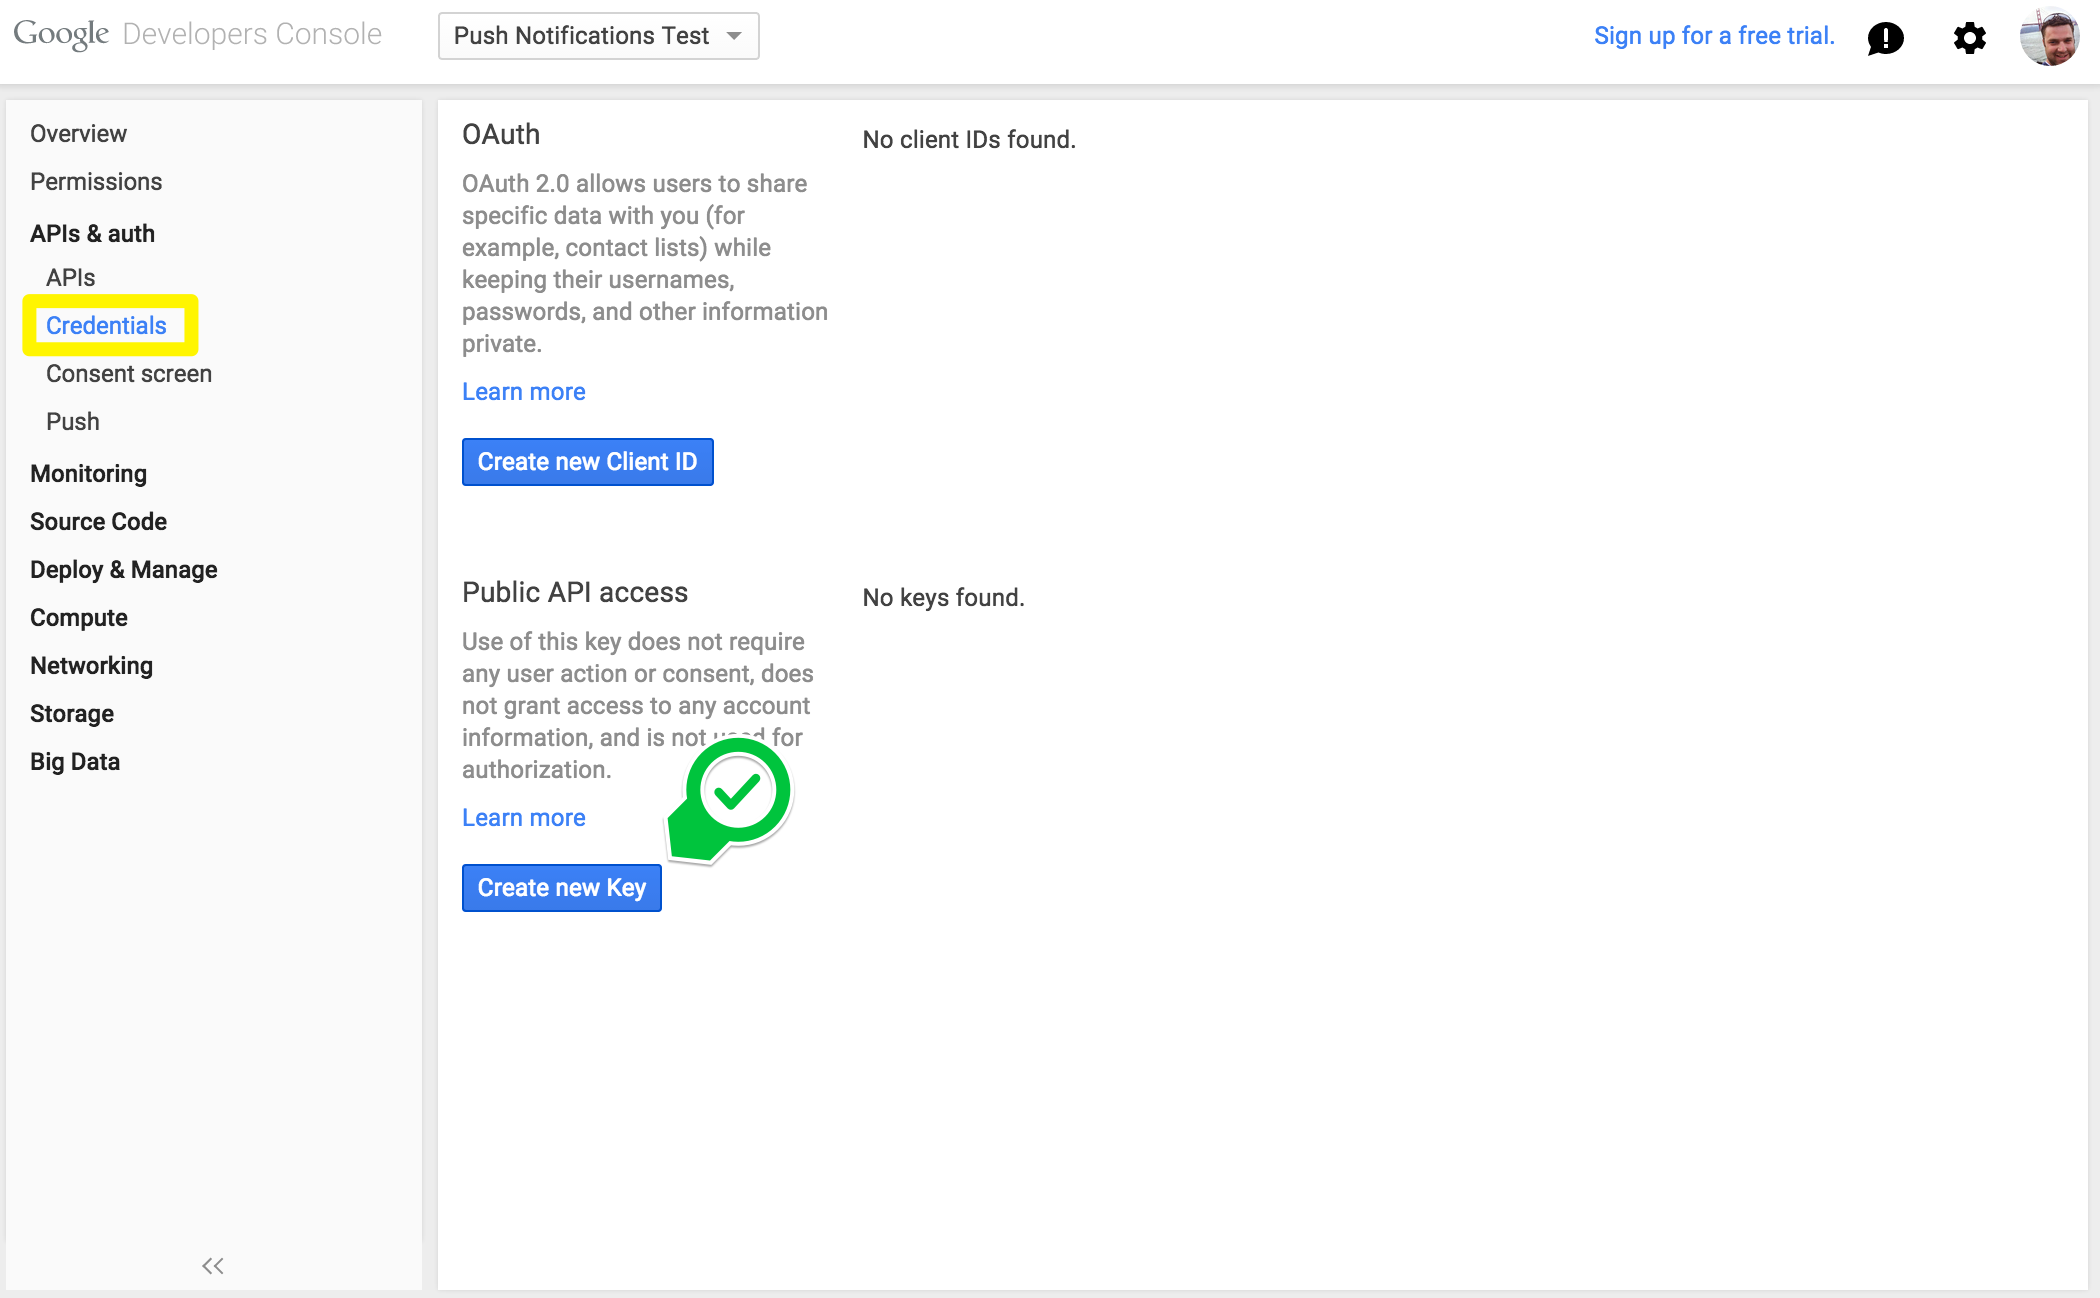
And the API key is created under ‘APIs & auth’ as shown below (if prompted, just select ‘server key’ and leave the list of authenticated IPs blank).
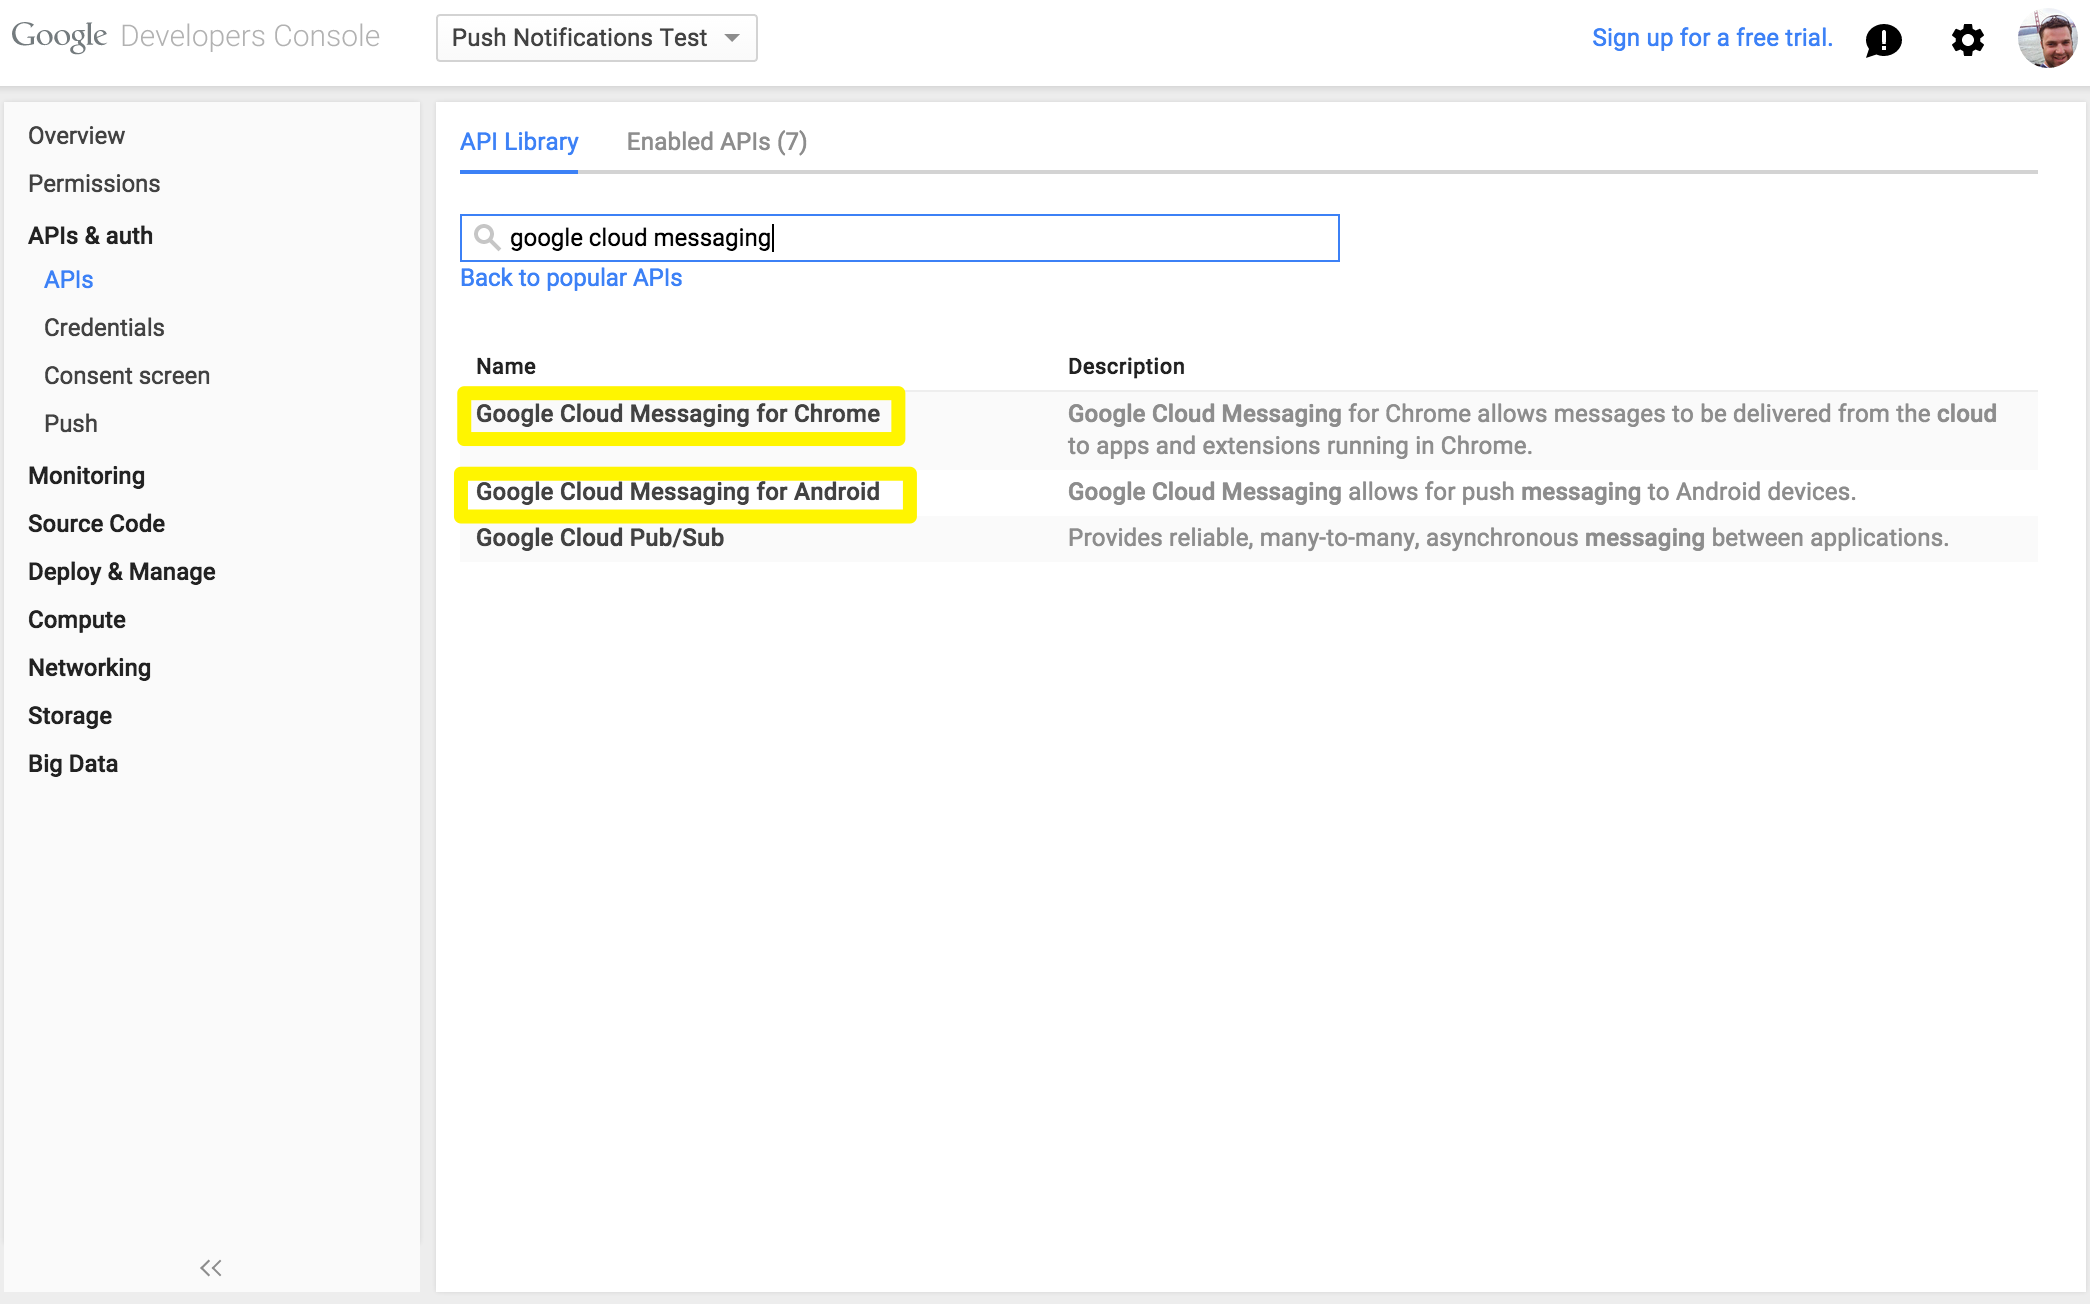
One more step, make sure you have the Chrome and Android APIs for GCM enabled. Click ‘APIs’ on the left and search for ‘google cloud messaging’. Enable the following two:
You should now have both your API key and project number. First, let’s take care of the project number. Remember that manifest.json file we just stuck some random data into? One of those keys was called ‘gcm_sender_id’. It just so happens that’s where your project number goes. Go ahead and replace ‘123’ with the project number from the developer console.
We’re almost ready to put together a cURL request to test this out. Only one more thing we need and that’s the subscription id. Basically, it’s how you know who to send the push notification to. In the subscribe method (in push-notifications.js), add the following line under the ‘console.log’ that’s already there. This will give us the cURL command to run in the terminal (make sure to replace API_KEY, including the angle brackets, with the one you received in the developer console).
console.log('curl --header "Authorization: key=<API_KEY>" --header "Content-Type: application/json" https://android.googleapis.com/gcm/send -d "{\\"registration_ids\\":[\\"' + subscription.subscriptionId + '\\"]}"');
push-notifications.js
Reload the page and click ‘Enable Push Notifications’, you should see the complete command in the console. Paste this into a terminal window to test things out. You should see the notification appear just like you did before, but this time you’re doing it via a cURL request–neat! In an actual application, you would probably send the user’s subscription ID to your server so that you could then compile a list of subscription IDs and send a notification to everyone. Or, perhaps just certain people. The choice is all yours, my friend.
So that’s it. Make sure to check out some additional resources below and feel free to reach out to me via a comment or tweet me at @derrickshowers.
Resources
-
Video from Google Developers YouTube Channel – published right after Google I/O 2015. Great summary in video format (and only ~7 minutes)!
-
“Push Notifications on the Open Web”, Tutorial by Matt Gaunt – great article that goes much more in depth. A lot of my knowledge is based on this article. He does a good job at covering some of the edge cases, too (e.g. what if notifications aren’t supported, changing the text on the button if push notifications are already subscribed to, and much more)
-
Documentation from Google on Google Cloud Messaging for Chrome
-
Finally, here’s the Github repo if you want to cheat sheet. :)